 Today, we continued our painting journey. As I mentioned yesterday, creating a lifelike baby involves many, many, many...many layers of paint. Each additional layer adds subtle depth and life. Unfortunately, the details are so subtle that your eyes see them better than my camera can. Still, I put together the time lapse photography video below to show the steps that we covered today. Looking at just his right foot, it starts with the blank vinyl, goes through the primer and all the mottling, ending with blushing. Can you see the transformation? Mottling!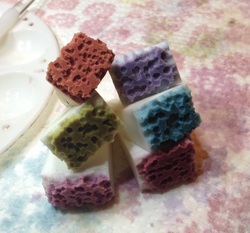 To create lifelike baby skin, there are six layers of mottling. Each layer is a different color. Each color, has a special sponge. I pattern each sponge by hand to create a natural-looking skin pattern. As you can see, red, blue, purple and even green are needed to bring a baby to life. Once the mottling is complete, I hand paint veins on the head, hands and feet. Then, I add a few flesh tone layers (Flesh 08 as requested) to place these veins under the skin. 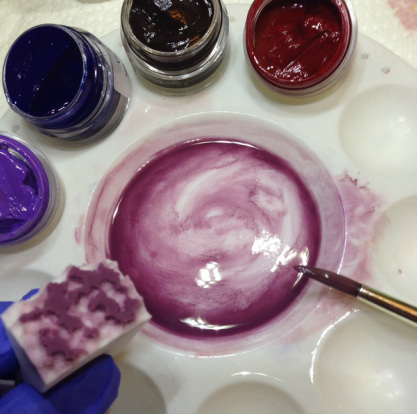
Blushing!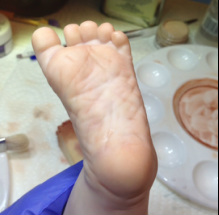 I love everything about creating dolls, but blushing is one of my favorite parts.
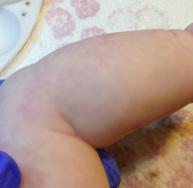
Once I'm happy with the skin tone, I begin to add a little extra sweet rosiness to the fingers and toes, cheeks and nose. This detail really brings the doll to life. So far, I've only done the first layer of blushing on the hands and feet. Next time, we'll blush the face and continue to work on some more details. More to come!
1 Comment
Maisy and mama
9/1/2014 08:39:00 pm
Wow Kim! Thanks for the awesome update. It is amazing to see the intricacy involved in making the doll so lifelike. Who knew all those colors could combine to make baby-colored skin! Love the timelapse, so cool. Leave a Reply. |
Reborn Doll Babies
All
Reborn Doll ArtistHi! My name is Kim. I am a reborn artist based in NC. I have been creating dolls since I was a child. I discovered the art of life-like baby dolls in 2011 and have been reborning ever since. Archives
December 2016
|

 RSS Feed
Home | Custom Dolls | Portrait Dolls | Pricing and Payment | Contact Us
Promotions | Reborn Baby Doll Care | Vote for Us
Promotions | Reborn Baby Doll Care | Vote for Us
Reborn Dolls distributed by CustomDollBaby.com are high-end collectibles not intended for children under age 12
© 2017 Custom Doll Baby, Inc.
© 2017 Custom Doll Baby, Inc.